
Teaching Needlepoint to Grandchildren: A Simple Start
Last Updated: November 10, 2026
Quick Summary
To teach needlepoint grandchildren, match the project to the child's age and start with a simple printed kit. Preschoolers need short five-to-ten-minute sessions with you doing most of the threading, while school-age children can handle a simple kit with a two-step guide. Keep lessons short, safe, and fun.
- Preschoolers (roughly 3 to 5) need five to ten minute sessions with you handling most threading and knotting.
- School-age children (roughly 6 to 10) are the sweet spot for most beginners with a simple kit.
- Tweens (roughly 11 and up) can often manage threading and knotting and may learn basketweave.
- Lessons for school-age children should last fifteen to twenty minutes, ending while they still want more.
- Keep the tapestry needle in a pin cushion or tin and count needles before and after each session.
Table of Contents
- Picking the Right Age and First Project for Little Stitchers
- Gathering Kid-Friendly Needlepoint Supplies
- Threading the Needle and Starting Your First Stitch
- Easy Needlepoint Stitches for Beginners, Including the Long Stitch
- Keeping Lessons Short, Safe and Fun With Your Grandchild
- Booking Your First Stitching Afternoon Together
- Frequently Asked Questions
Picking the Right Age and First Project for Little Stitchers
Teach needlepoint grandchildren one simple stitch at a time, and it's one of those lovely projects that can start small and grow into something special.
When you teach needlepoint grandchildren of different ages, you'll notice they fall loosely into three groups, and each one needs a different approach.
Preschoolers (roughly 3 to 5). At this age, needlepoint is mostly about the motion, not the picture. Expect short bursts of five to ten minutes, and plan on doing most of the threading and knotting yourself.
School-age children (roughly 6 to 10). This is the sweet spot for most beginners. Children in this range can usually handle a simple kit and follow a two-step instruction. They can thread a needle with a bit of help and start to take ownership of color choices.
Tweens (roughly 11 and up). Older children often want to work independently and may be ready for a more detailed design or a finer mesh. They can usually manage their own threading and knotting, and they may enjoy learning a second stitch like basketweave.
A quick readiness check can help you decide where your grandchild falls: can they sit still for a short stretch, follow a two-step instruction, and hold a small object with a steady grip? If the answer is yes to most, a simple kit is a good start.
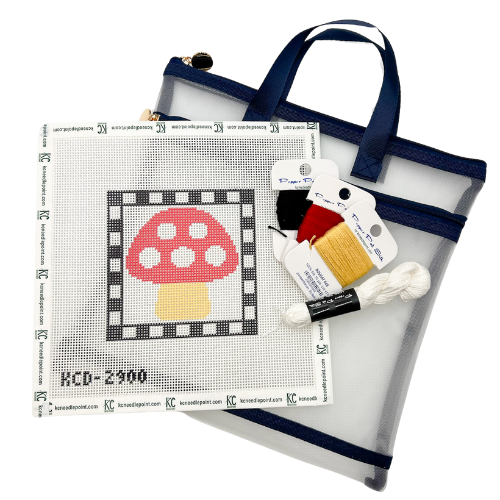
The Mushroom Square Needlepoint Canvas Kit is a sensible choice for school-age beginners, since the printed canvas and stitch guide keep things simple. The small flower pot canvas is a simple, compact design to start with.
Watch out: a project that looks charming to an adult can feel overwhelming to a five-year-old, so match the design's number of colors and details to the child's patience, not your enthusiasm.
Gathering Kid-Friendly Needlepoint Supplies
The right supplies make a huge difference. Browse the hand-painted needlepoint canvases to find a design that suits a child's first project. A frustrating first try can end a hobby before it starts, so pick materials that are easy to handle.
Here is what you will need for a simple start:
- A printed canvas: The Mushroom Square Needlepoint Canvas Kit comes with a printed canvas, silk threads, and a stitch guide, so everything is in one box.
- Thread: Choose thread in bright colors that match the design. Kids love picking their own shades.
- A blunt tapestry needle: A size 20 needle is easy to thread and gentle to use.
- Scissors: Blunt-tipped scissors are safer for small hands.
A few guides on needlepoint basics note that thread quality matters too. DMC thread guide for beginners can help you understand how thread weight and fiber affect stitching.
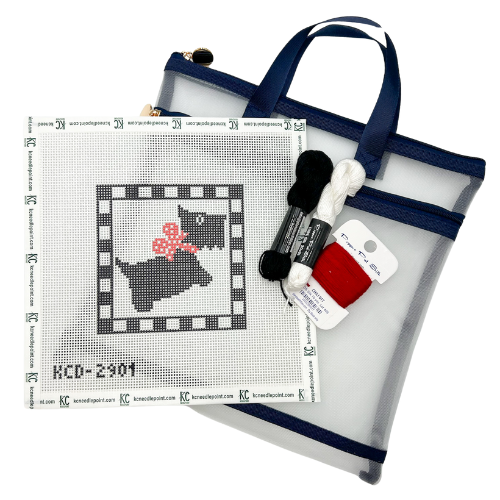
The Scottie Square Needlepoint Kit is another easy pick. Its 13-mesh canvas is roomy enough for beginners, and the design is playful without being busy.
Watch out: a canvas with a very fine mesh count, such as 18 mesh or higher, can frustrate a young beginner. Save those for later.
Threading the Needle and Starting Your First Stitch
Threading a needle is the first hurdle, and it can take a few tries. Cut a length of thread about 18 inches long, then have your grandchild fold it over and push the cut ends through the eye together. This gives them a doubled thread that is easier to work with.
Show your grandchild how to start a stitch with a waste knot. Tie a knot at one end of the thread, then push the needle into the canvas a few holes away from where the stitch will begin. Stitch over the thread, then trim the knot once the stitches hold it in place.
Here is a simple way to start:
- Thread the needle with a doubled length of thread.
- Tie a small knot at the end.
- Bring the needle up from the back of the canvas.
- Make your first stitch in a single, steady motion.
Let them practice on a scrap piece of canvas before the real project.
Easy Needlepoint Stitches for Beginners, Including the Long Stitch
Keep the stitch list short. Two or three stitches are plenty for a first project, and they cover most of what your grandchild will use. Try the Watching Together canvas to practice these basics on a sweet, simple design.
The tent stitch is the easiest place to start. Each stitch is a small diagonal, worked up and down across the canvas.
Once the tent stitch feels comfortable, try the long stitch. It covers several holes at once, so it fills space quickly.
Here is a simple stitch order to follow:
- Tent stitch: Best for outlines and small areas
- Long stitch: Best for filling larger shapes
- Basketweave: A more advanced option for later
Watch out: pulling thread too tight will warp the canvas. Tell your grandchild to keep the stitches snug but not tight.
Here is a quick look at the stitches the article recommends for a first project.
| Stitch | Best for | Key difference |
|---|---|---|
| Tent stitch | Outlines and small areas | Small diagonal stitch, the easiest to start with |
| Long stitch | Filling larger shapes | Covers several holes at once, so it fills space quickly |
| Basketweave | Later, more advanced work | A more advanced option for later |
Keeping Lessons Short, Safe and Fun With Your Grandchild
Short lessons work best, and a little planning keeps them safe and enjoyable. Aim for fifteen to twenty minutes of stitching for school-age children and closer to five to ten minutes for preschoolers. When you notice stitches getting sloppy, the thread tangling more often, or your grandchild wandering off to find a snack, that is your cue to stop. Ending while they still want more is the best way to bring them back to the table.
Needle safety deserves a clear plan. Keep the tapestry needle in a pin cushion or a small tin whenever it is not in use, and never leave it loose on the table or in a chair cushion. Count the needles before and after each session. An adult should handle the threading and knotting for young children, and should take over any time a child is pulling thread through the canvas with a tight, forceful motion. Blunt-tipped scissors are the only cutting tool a child should use, and only under supervision.
When things go wrong, a few quick fixes help:
- Tangled thread: Stop, lay the piece flat, and gently untangle the strands by hand rather than yanking them.
- Uneven tension: Tell your grandchild to keep stitches snug but not tight. If the canvas starts to pucker, loosen the last few rows gently.
- Missed holes: Pull the stitch out carefully with the needle tip and redo it. Mistakes are a normal part of learning, and kids usually take them in stride when you do.
- Stitches pulling the canvas out of shape: Check whether the thread is too tight, then re-block the piece by pressing it flat under a damp towel.
Make it a little game. Pick a new color each session, count stitches out loud, let your grandchild choose the next design, and admire the finished row together before you put the project away. Praise the effort more than the neatness, and celebrate small wins.
Watch out: a child who is tired or frustrated will start to rush, and rushed stitching is where tangles and pulled canvas happen, so call it a day before the mistakes pile up.
Booking Your First Stitching Afternoon Together
Pick a rainy afternoon, clear the kitchen table, and set out a fresh canvas. Lay out the threads in the order you plan to use them, and let your grandchild choose the first color. Thread the needle together, make the first stitch, and enjoy the moment.
When you are ready to start, browse the Fabric, Cross-Stitch & Needlepoint collection for kits in cheerful designs. A simple kit and an afternoon together is all it takes to start a tradition that lasts for years.
Frequently Asked Questions
What is the best way to teach needlepoint to grandchildren?
Start with a pre-printed canvas and a single color of thread so the child can focus on the motion instead of the design. Demonstrate one stitch slowly, then let your grandchild copy you on the same canvas. Keep the first session to about 20 to 30 minutes, praise effort over neatness, and stop before frustration sets in. Working side by side, rather than handing over instructions, tends to make the lesson stick.
What is the easiest needlepoint stitch for a child to learn?
The basic tent stitch, also called continental stitch, is usually the easiest place to begin. It is a simple diagonal stitch worked over one intersection of the canvas, repeated row by row. Once that feels comfortable, the long stitch is a good next step because it teaches a child to carry thread across several holes. Both are forgiving, and mistakes are easy to pull out and redo.
What age can children start needlepoint?
Most children can begin simple needlepoint once they can hold a blunt tapestry needle comfortably and follow a two-step instruction, which often happens in the early school years. Younger children may enjoy stitching with a large-holed canvas and a short thread, with an adult guiding the needle. Every child develops fine motor control at a different pace, so let your grandchild's patience and interest set the timing.
What supplies do grandchildren need for a first needlepoint project?
A beginner kit is the simplest option: a printed canvas with a design, a tapestry needle with a blunt tip, a set of threads matched to the canvas, and a stitch guide. Look for a canvas with a mesh count that is not too fine for small fingers, and keep scissors and a small tray nearby. An adult should always keep track of needles and scissors during the lesson.

Comments